| HTML |
|---|
<script type="text/javascript">
<!--
function tell_toggle_visibility(id) {
var e = document.getElementById(id);
if(e.style.display == 'block')
e.style.display = 'none';
else
e.style.display = 'block';
}
//-->
</script>
<a href="#">
<img style="-webkit-user-select:none; display:block; margin:auto;" src="http://docs.tellnet.it/download/attachments/94047099404604/SMALL+_BANNER.jpg?version=1&modificationDate=1478427166505_White.gif" align="left" onclick="tell_toggle_visibility('tell_video');">
</a>
<br style="clear: both;">
<div style='display:block'></div>
<div id="tell_video" style='display:none'>
<iframe width="960" height="540" src="https://www.youtube.com/embed/kmP3KHK8014?rel=0&showinfo=0" frameborder="0" allowfullscreen></iframe>
</div> |
TIMONE System
...
allows to manage different content versions for one publication
...
and to plan regional or local editions of
...
the same issue.
Working on multiple editions:
If you are working on multiple editions, you can view the different editions you are working on in 2 different ways:
The first option is similar to the Single Edition view. This way, you can select the edition you want to work on by choosing it from the list. If you want that your actions on this edition will be applied also to all other editions, check the flag “All Editions”.
- The second option is to select the multiple edition view using the menu item “Views”. Thanks to this view, you will be able to see all the editions of an issue, the one under the other.
An issue could have an arbitrary numbers of editions.
All editions pertaining to an issue can be configured as fully customized, as shown in pictures .a1 and .a2, with reference to printer sections, covers, page numbering, name and colors.
These settings can be done at issue level in the area allowing to configure issues:

.a1 - Setting up edition Covers and Paging

.a2 - Selecting editions from Printer sections Tab

.a3 - Setting up edition Printer sections (to create the foliation of each edition)
The user can select the edition from the “Printers sections” Tab (see Figure .a2).
The system proposes all the available printer sections.
The “Issue Printers sections” box shows the printer sections which can be allocated using the arrow button for all the editions of an issue or for a specific edition of the issue.
The system will show the printer sections which have been allocated by the user to each edition (see Figure .a3).
The user also has the possibility to rename each signature/printer section depending on the content.
Single edition view
As we have seen, different editions can be planned. For planning editions, you can use the “Single edition view” or the “Multiple edition view”.
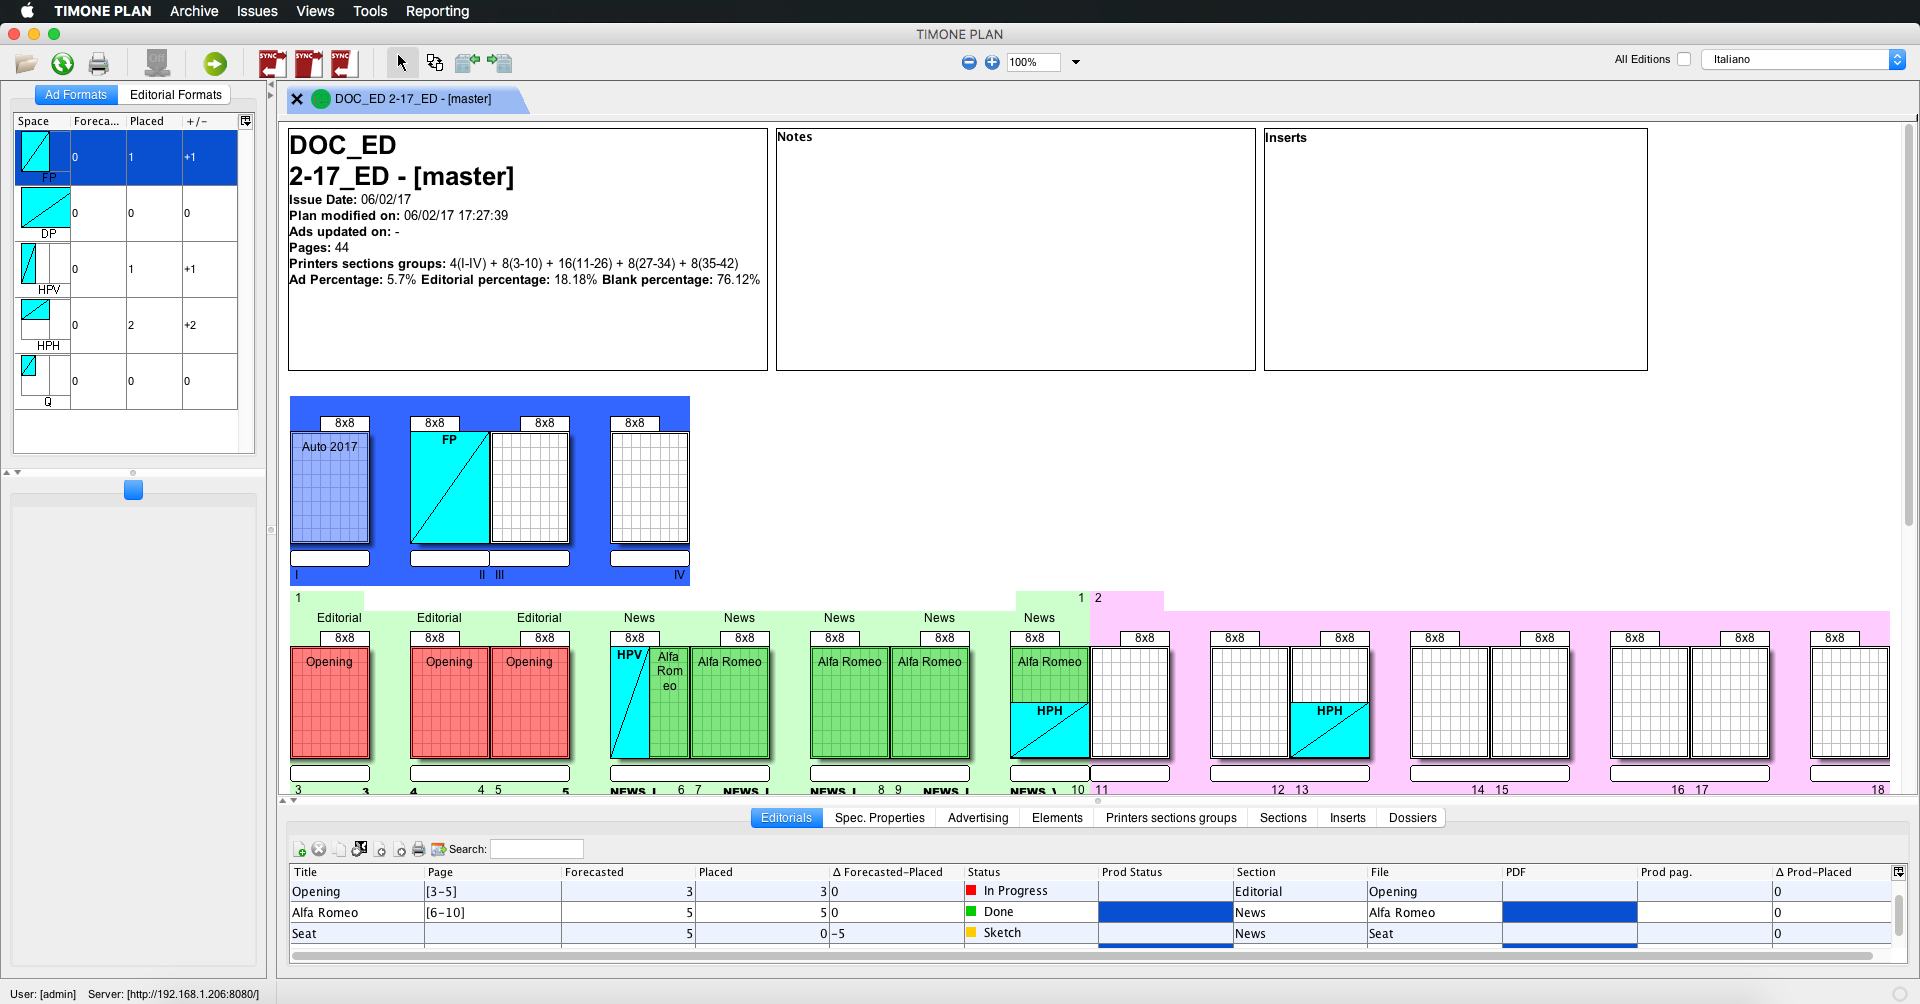
In the first case, switching between the editions shown on the plan can be made using the dropdown menu in the upper right area of the screen, as shown in picture .b1.
...
| Section | ||||||||||
|---|---|---|---|---|---|---|---|---|---|---|
|
| Warning |
|---|
In order to be able to work with the multi-editions, it is necessary that the publication has the editioning enabled. For more information, please refer to the Publication page in the Admin Guide. |
| Tip |
|---|
For more information about how to create a Multi-Editions Issue please refer to the Create a Multi-Editions Issue page. |
Working with multiple editions:
A Multi-Editions issue allows to choose between two different kind of views to work with: Single Edition View and Multiple Edition View:
- The Single Edition View allows to select from a drop down menu the edition to work on. Modifications made on the active edition are reflected on the other editions only if the "All Editions" flag is enabled.
- The Multiple Edition View allows to see all the editions of an issue within the same flat plan, one per line. Modifications made on the active edition are reflected on the other editions only if the "All Editions" flag is enabled. It's possible to switch to the Multiple Edition View from the "View" menu.
Single edition view
While using the Single edition view the user can switch between the editions with the drop down menu in the upper-right area of the screen as shown in picture .a1.
a1 - Working with "Single edition view" and "Editorial view"
...
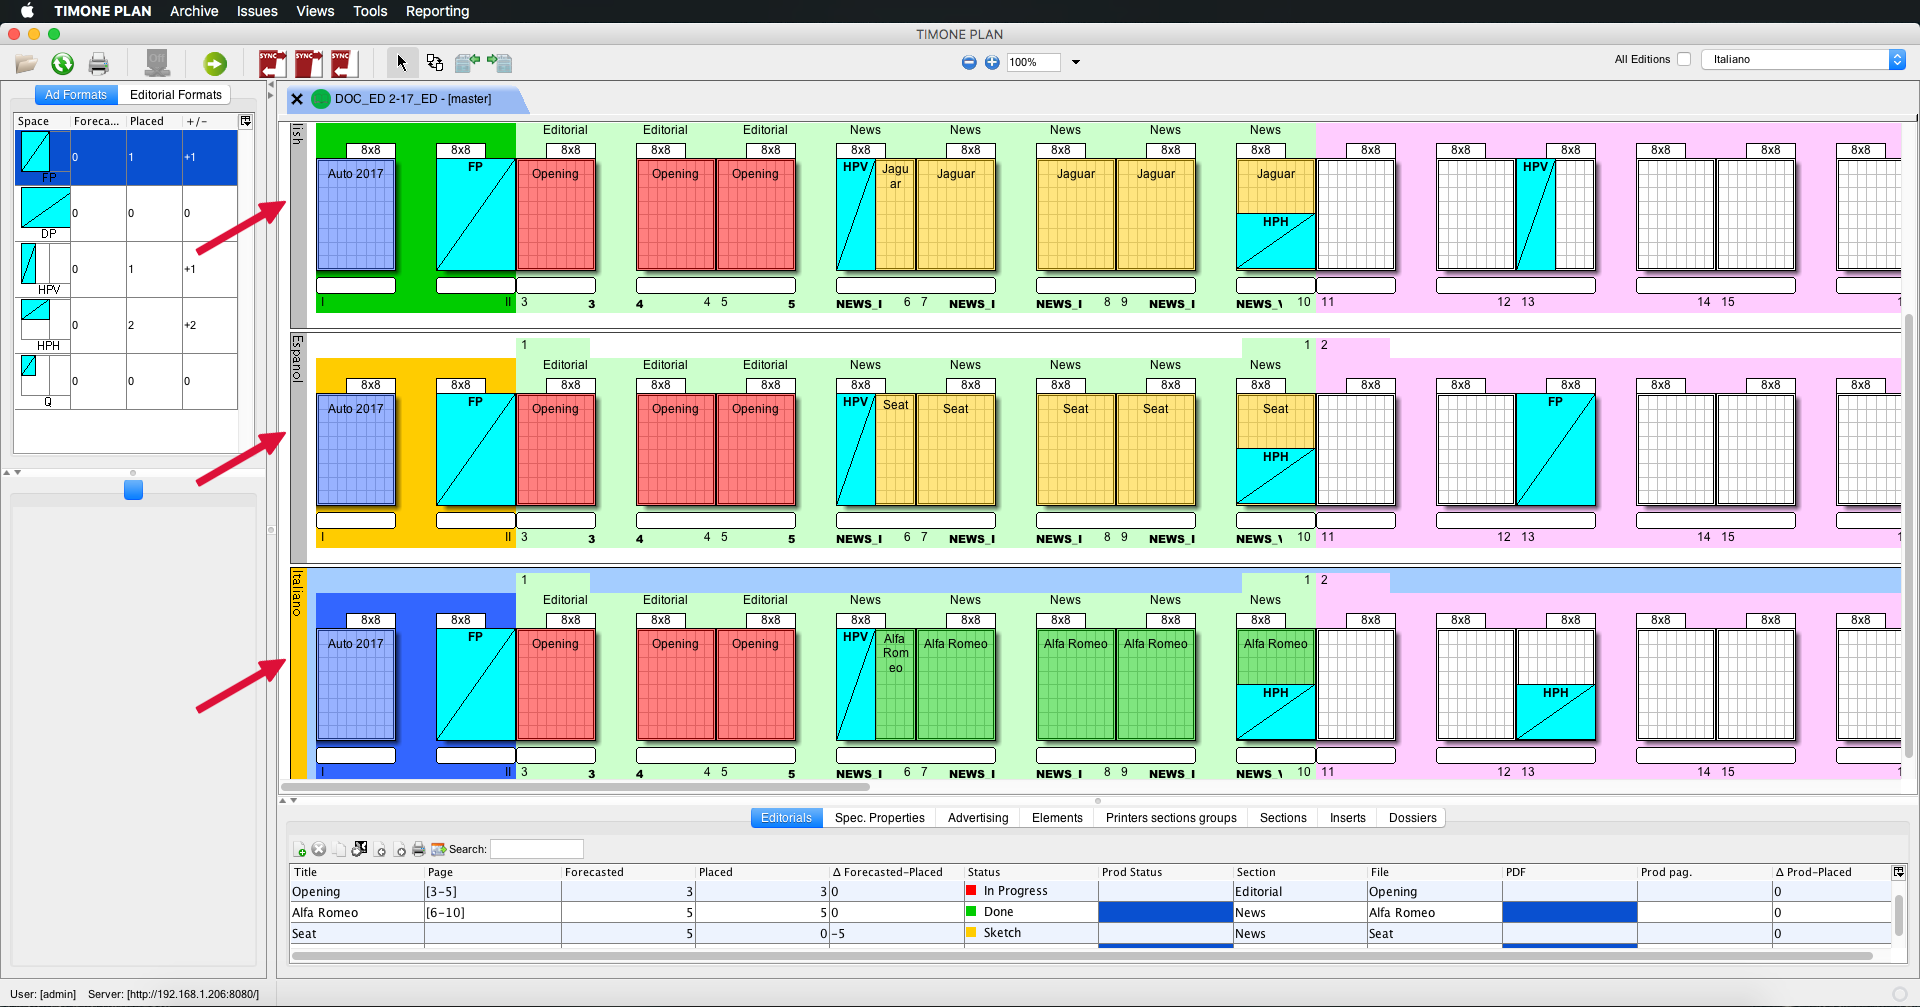
Multiple editions view
The “Multiple edition view” can be used to work having all editions on the same screen Multiple editions view allows to see all the editions of an issue within the same flat plan, one per line, as shown in Picture .b2; the editions are a2.
Each edition is shown on different lines line and the selection of the active edition is made through the dropdown menudrop down menu or by the shortcut ⌘+M // ctrl+M.
It is possible to make changes on all the editions at the same time by flagging the “All Editions” checkbox in the upper right corner of the screen, next to the edition selection dropdown drop down menu , on the top-right corner (see Picture .b3a3).
In the multiple edition Multiple editions view the side bar sidebar related to the active edition is highlighted in orange colorblue.
By flagging the “All Editions” checkbox, the editorial planning made for the active edition (including for example advertisement placeholder positioning) is applied to all editions.
It is also possible to control the placeholder allocation through different editions assign editorials or adverts to an edition using the contextual menu and by right-clicking on the editorial them (see Picture .b6a6).
By unflagging or flagging the edition name, it is possible to deallocate or to allocate the editorial placeholder object selected for the other editions.
.b2a2 - "Multiple edition view" and "Editorial view"

.b3a3
...
Show differences
This feature is useful when it is necessary to highlight show the differences between among the various editions of an issue. This view shows only the contents which are different with respect to contents which are shared by all editions (see Picture .b4).
This feature can be selected enabled from the dropdown menu “Views”.

...
drop down menu Views > Show the difference or by the shortcut ⌘+D // ctrl+D.

.a4 - "Multiple edition view", "Editorial view", "Show differences"


.b5 a5 - A detail with "Multiple edition view" using the "Editorial view"


.b6a6 - Edition selection using the dropdown drop-down menu of the "Editorial view"
Working with editions on the
...
flat plan
This section aims to guide the user through the various functionalities pertaining to multiple editions.
The available functions basically refer to 3 modes allowing to manage editorials and advertising objects.
After having accessed to TIMONE Plan, the user has the possibility to select the publication, the issue and the relevant edition to work on.
The user also has the possibility to rename each edition of a publication’s issue depending on the content (such as, for instance: “national”, “regional”, “local” and so on) simply clicking on the desired by selecting the edition row and typing the new name.
After having loaded opened the desired edition, it is possible to use 3 three different views:- the
- Editorial
...
- View;
...
- Advertising
...
- View;
- the Compact view (a compressed view which can be selected from the dropdown menu “Views”)
...
- Compact View
Placing an editorial or an advertising placeholder on
...
all editions
...
For placing and editorial or an advertiding placeholder on all editions, the “All Editions” checkbox, located in the toolbar , at the upper right corner of the screen, shall be enabled.
To allocate an editorial (or an advertising placeholder) select the desired editorial from the “Editorial” Tab (see list below), select the format “Editorials” list and drag and drop the page format on the Plan from the upper left area of the screen, as shown in the following picture:

...
it on theflat plan:
| Section | ||||||||||
|---|---|---|---|---|---|---|---|---|---|---|
|


The editorial is automatically placed on all editions.
Deallocating an editorial or an advertising placeholder on all editions
To deallocate the entire editorial, or one page of the editorial or multiple pages of the editorial, or an advertising placeholder from the flat plan, the user can select it and press the backspace key.If
If there is the flag on “all editions”, then all the changes done made on an editorial or an advertising placeholder will be applied to all editions.You can verify
To check that the editorial/advertising placeholders are visible on all editions by switching through them using the combo box , the user can switch through the editions using the drop down menu located in the toolbar, next to the “All Editions” checkbox.If you later need to remove for example one page of an editorial only from one of the editions, de-flag the checkbox “All editions”, select the concerned edition and remove the page only from that edition.
...
Working with editorials and advertising placeholders on the active edition
If you do not want to plan, move, change, delete editorials and advertising pages for all editions, but you want to In order to execute specific operations only on one edition, select this edition and make sure that there is no flag on uncheck the “All Editions” editions” checkbox located in the toolbar, in the upper right corner of the screen. All the modifications done on a specified editorial or advertising placeholder select the edition to make the modification to and do the modification. All modifications will be applied only to the active edition only.
You can verify that the editorial/advertising placeholders are visible only in the active edition and not in the other editions also by switching through them using the combo box located in the toolbar, next to the “All Editions” checkbox.
If you want to add the same editorial or advertising into another edition afterwards, you just have to right-click on the editorial and select the additional edition where you want the editorial / advertising to be published.
Switching editorials placeholders from one edition to the other using the contextual menu or drag&drop
This function allows to allocate or deallocate all the selected editorial placeholders on a specified edition.
You can select an allocated editorial by right clicking on the desired item. A contextual dropdown menu shows the available editions. By checking one or more editions, all the editorial placeholders will be assigned to the desired edition/s. On the other hand, by unchecking one or more editions, the above editorial placeholders will be deallocated from the desired edition/s.
This contextual menu allows to make changes to one or more selected editions.
In the multi-edition view is it also possible to copy editorials from the active edition to a different one by simply dragging and dropping them to the desired location.
...
| Section | ||||||||||
|---|---|---|---|---|---|---|---|---|---|---|
|


Users can assign an existing editorial or advertising placeholders to another edition just by right-clicking on it and selecting the additional edition the object shall be assigned to.
Working with editions in integration with the editorial system WoodWing Enterprise
The management of editions in TIMONE Plan is integrated with the management of editions in WoodWing Enterprise, also at InDesign file level. Any change, addition, deletion, etc., which takes place in the flat plan, is applied in WoodWing in the InDesign file.
Within the WoodWing Enterprise InDesign file, editions are managed as InDesign layers.
| Tip |
|---|
For futher information on the integration with the Editorial System, please refer to the Working with the Production System page. |
...
| Info | ||
|---|---|---|
| ||
...