
...
This page is accessible only by Graphic Designers users , and allows to create new order not related to a specific document of the editorial system.
From here, in fact, it is possible to specify manually what is the publication and the issue related to the new order (or create a new issue). Then the user must upload the images to work. Currently, Peppers supports three four different formats of images:
JPG / JPEG;
PNG;
PSD
But in the 1.8 release, will also support TIFF images.
;
TIFF / TIF.
| Info |
|---|
The workings available for format and publication can be managed from the Management of Activities by Image Type and Publication page |
After the uploads of the images, the Graphic Designer must insert all the assignments on each image, by selecting the specific manual operations to be done by the Photo Editor that will take on the order.
...
To carry out this operation you have to, it is necessary to follow the steps below:
- Select a Publication;
| Section | ||||||||||
|---|---|---|---|---|---|---|---|---|---|---|
|

| Info |
|---|
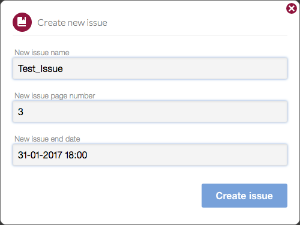
The creation in Peppers of an existing issue (but not related) in the editorial system is necessary to complete the creation of a new order from the web application. It can be done in the wizard moment of the creation of a new order. The user will be asked to insert the known parameters to represent an Issue:
The new issue and its information can be then managed by an administrator user in the Issue Management page. |
...
4. Save the new order click on Create New Order button;

5. Now you can it's possible to upload images from work into Peppers;
| Info |
|---|
| To upload images you can perform a Drag & Drop or click on the Multi-Upload Button. |
| Info |
|---|
The allowed formats are: .JPG jpg, .PNG png, . PSDpsd, .tiff. |

6. After you Once images have uploaded the images you will be able been uploaded, it is possible to:
- Delete an image by clicking the Cancel button;
- Assign images
...
- internally clicking on the Assign button
 ;
;
...
- Assign images externally clicking on Upload button
 .
.
7. Now by clicking on the button  will be possible to access the Work Assignment page.
| Anchor | ||
|---|---|---|
|
| Section | ||||||||||
|---|---|---|---|---|---|---|---|---|---|---|
|


| Note |
|---|
To Assign an Internal Processing must also be added the image PATH in order to work the image locally:
The image path is obtainable in different ways, for example by dragging the image on the terminal or by right-clicking on the image and copying the path from the file information. |


| Tip |
|---|
In Grid View, it's possible to assign multiple work to each image selected. Selecting multiple images will appear in the button assign multiple work and clicking on it is possible to define the same processing for each selected image:
|


...
8. From Work Assignment Page you can it's possible to assign for each image one or more jobs;
| Info |
|---|
| You can decide if the job will be internal or external and you can It's also possible to add notes for the photo editor. |
9. Save assigned jobs clicking on  ;
;
| Section | ||||||||||
|---|---|---|---|---|---|---|---|---|---|---|
|


11. Once you have confirmed the work workings and sent in the "To Do" list , the graphic designer can change the assigned work clicking on the Return to "Automatic Processing" Status button  .
.
...